This is called the grid and is useful when you compose pictures using the rule of thirds photography method. Even if you don’t use this or know what it means, simply having those lines can help you to better position the objects of your picture. You can turn off the iPhone camera grid by going to Settings > Camera and tapping the button next to Grid. The iPhone camera is perhaps the most used camera in the world. Not only is it present on one of the most popular devices ever created, but it can also take some pretty good pictures. There are a number of different settings, tools, and features available to iPhone camera users, including something called a Grid. This grid is meant to be used as a means to properly set up a picture. This is accomplished by placing the objects of the pictures within the gridlines that overlay the camera. However, you might not be using these gridlines, and find that they cause more problems than they fix. Fortunately, this grid is not a permanent fixture of the Camera app and you can remove it if you aren’t using it.
How to Remove the Lines on the Screen for the iPhone 7 Camera
Our guide continues below with additional information on turning off the camera grid on an iPhone, including pictures of these steps.
How to Turn Off the Camera Grid in the Camera App on an iPhone 7 (Guide with Pictures)
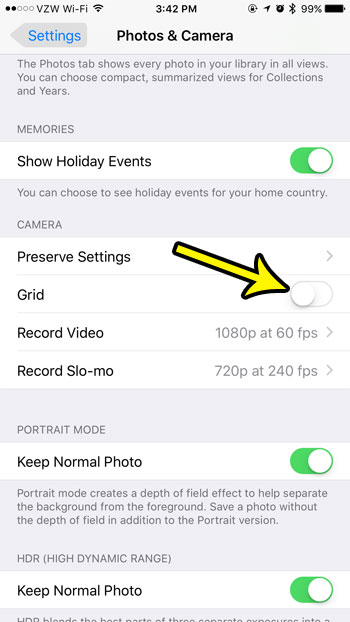
The steps in this article were performed on an iPhone 7 Plus in iOS 10.3.3. By completing these steps you will turn off the grid that overlays the viewing window on the iPhone’s camera. These are the lines that separate the camera into 9 separate rectangles. If you find that you actually use the grid more than you realized, you can always come back to this menu and turn it back on in the future.
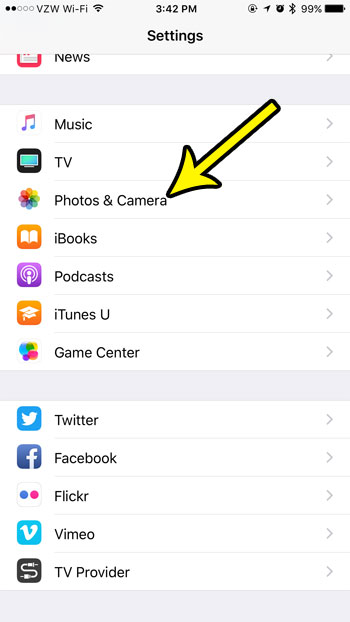
Step 1: Open the Settings app.
Step 2: Scroll down and choose the Photos & Camera menu option.
In newer versions of iOS, such as iOS 15, this menu is just called “Camera” now.
Step 3: Scroll to the Camera section of this menu and tap the button to the right of Grid to turn it off.
Note that there are several other settings on this menu that you might want to adjust as well. Our tutorial continues below with additional discussion about enabling or disabling the iPhone camera grid.
More Information on How to Disable or Enable Grid Lines When Taking an iPhone Photo
As we mentioned earlier in this article, when the grid is enabled for your iPhone’s Camera app you are going to see a series of vertical and horizontal lines on the screen. This is something you can use on other Apple products, too, such as the iPad and the iPod Touch. If you are interested in trying to take pictures when the grid is enabled, then make sure the setting is enabled on your device, then launch the Camera app from your Home screen or by tapping the Camera icon on the lock screen. The purpose of the lines is to help you position important compositional elements of your photos in the best spots in the frame. You will want to put important focal point objects on the lines of the grid. For example, outdoor landscape pictures might want to position the horizon or the sky along a horizontal line. Once you start experimenting with using the grid lines to create images where you place focus pieces along the lines of the image you can see how it should work. Plus the shots you take using this method will almost certainly look better than pictures taken without it. Have you ever received a picture from someone that seemed to move for a split second when you first opened it? These are called Live Photos and this article will show you how to start taking them with your iPhone 7.
Additional Reading
He specializes in writing content about iPhones, Android devices, Microsoft Office, and many other popular applications and devices. Read his full bio here.


