If you’re on a limited data plan, however, this can cost you money. If you reach (or breach) your data cap, you could end up paying out in extra charges or see your internet speeds throttled as a consequence. To avoid this, you can limit your data usage on Windows 11—here’s how.
Set Your Windows 11 PC to a Metered Connection
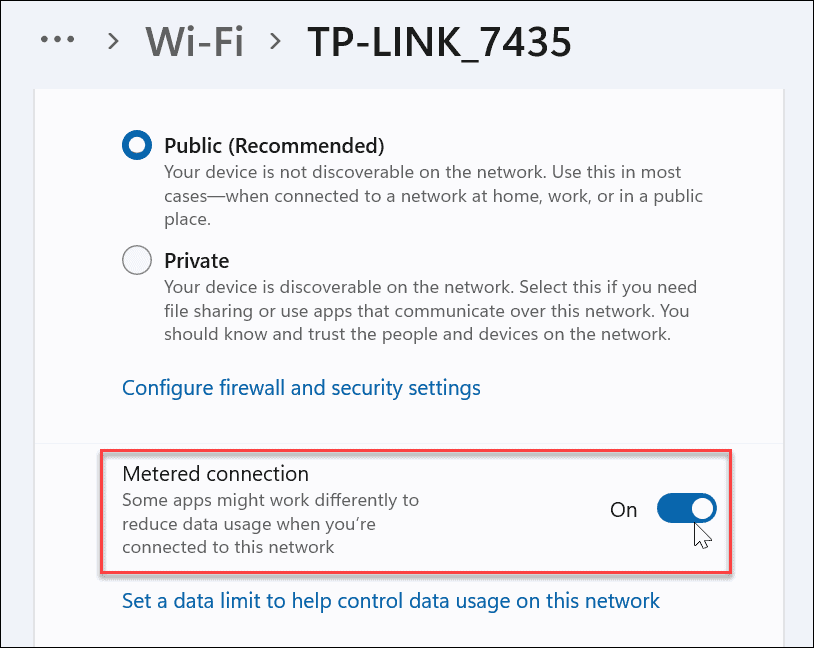
One of the simplest methods to cut down on Windows 11’s data use is to set your network as a metered connection. A metered connection limits the data that Windows uses in the background, while also enabling a set limit on the data your PC can use over a certain time period. Ethernet and Wi-Fi connections need to be manually set to metered, but cellular data connections are set as metered by default. Keep in mind that certain apps and services may not work as expected if they’re receiving less data on a metered connection. For example, OneDrive syncing may stop working if you’re using a metered connection on Windows 11.
Disable Startup Apps
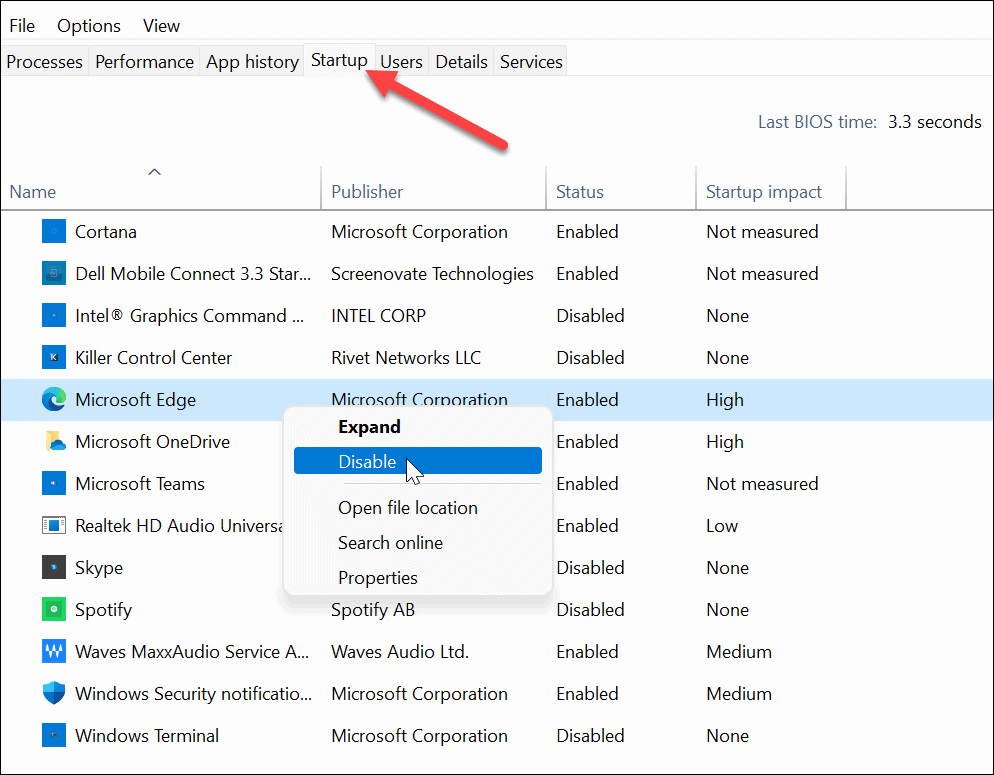
Disabling startup apps will improve boot time, but it can also help improve data usage. For example, if you have Facebook or OneDrive (more on that below) set to run on startup, these apps will be sucking up data and bandwidth. Stopping apps from running during startup will help save data without thinking about it, particularly for apps that run in the background.
Disable Background Apps
You can also stop certain background apps from working in the Settings menu. By default, Windows allows every Microsoft Store app to run in the background. These apps are free to sync data, send notifications, and more. This means that apps like OneDrive, Mail, Facebook, News, and others are free to suck up your data while running in the background. Unfortunately, disabling them isn’t as easy as it is in Windows 10. To turn background apps off in Windows 11, open Start > Settings (Windows key + I) and then click on Apps > Apps & Features.
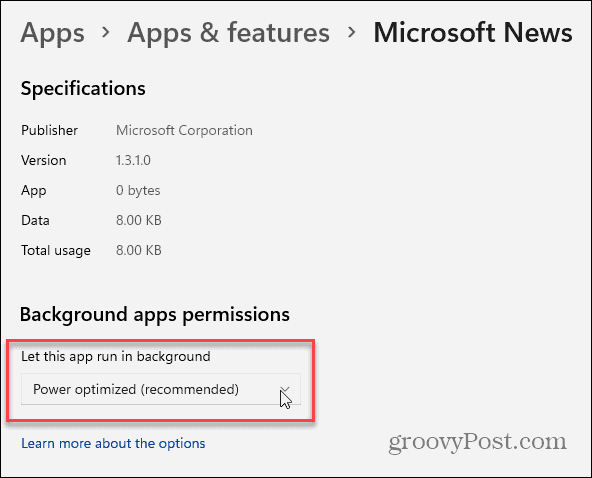
In the Apps & features menu, scroll through the list of apps and locate the app you want to stop running in the background. Next, click the Options button (three dots) and then click Advanced Options in the drop-down menu that appears.
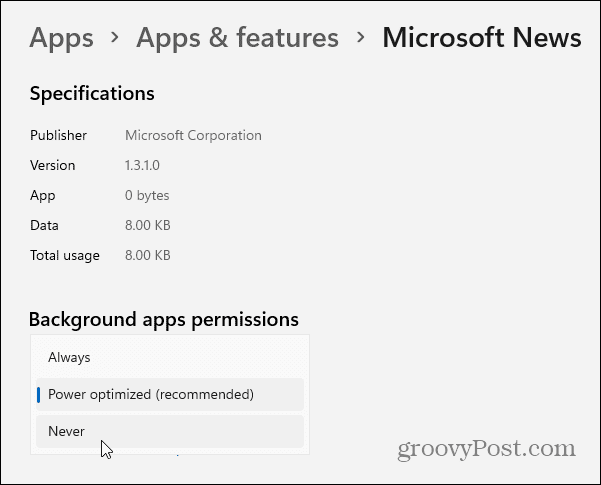
Scroll down to the “Background Apps Permissions” section next, then press the dropdown menu under “Let this app run in the background.” From here, you can configure how Windows will allow apps like these to use your connection in the background—Windows sets the apps to “Power Optimized” by default. It will turn off apps when you enable power-saving mode, for example.
To ensure the app doesn’t run in the background, select “Never” from the menu. You will need to do this for each app that you want to stop running in the background.
Pause OneDrive Syncing
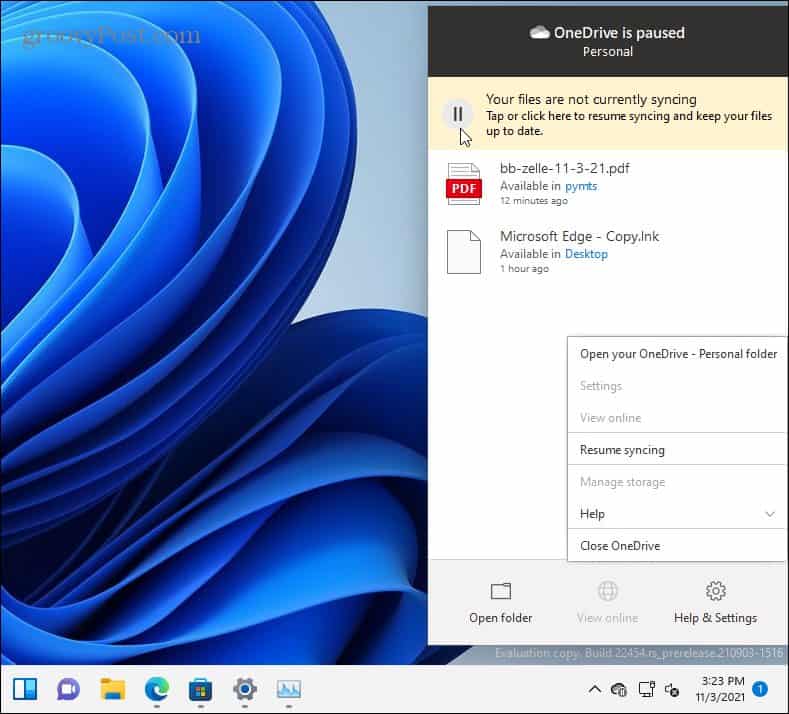
OneDrive is the integrated cloud storage solution for Windows PCs. As an integrated part of Windows 11, OneDrive will sync your files to Microsoft’s servers automatically. This means that OneDrive is syncing data in the background by default. If you want to stop this temporarily, you’ll need to pause OneDrive syncing. With OneDrive syncing disabled, you’ll need to manually sync your data on non-metered connections to limit your data usage. To do that, right-click the OneDrive icon on the taskbar and click Pause Syncing from the menu. You can choose to pause OneDrive syncing for 2, 8, or 24 hours.
While syncing is paused, you’ll see a pause icon on the OneDrive icon on the taskbar. You will also see a notification when you open the OneDrive menu. To start syncing again, click Resume Syncing or click the pause button on the top message.
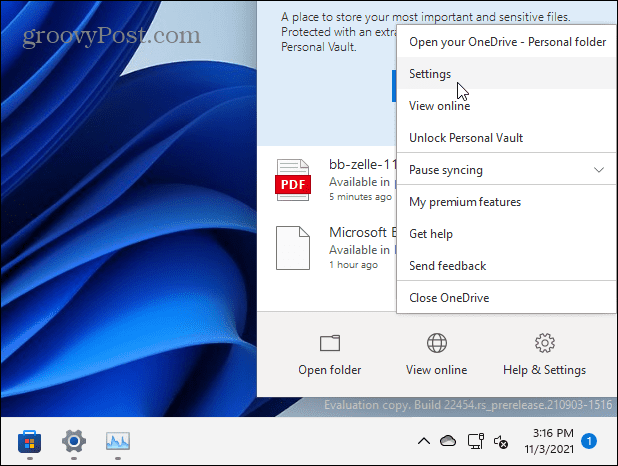
You can also configure OneDrive’s sync settings in the OneDrive app. To do this, right-click the OneDrive icon and click Settings.
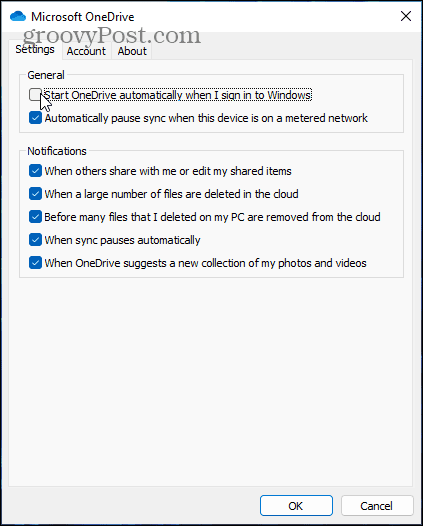
Click the Settings tab in the window that appears. If you want to stop OneDrive from opening on startup, uncheck the Start OneDrive automatically when I sign in to Windows checkbox. Otherwise, make sure that Automatically pause sync when this device is on a metered network is checked, then click OK to save.
Windows Update Delivery Optimization
If you have more than one Windows 11 PC on your network, you can use Windows Update Delivery Optimization (WUDO) to get updates from other PCs. This lets you share the updates on your local network, reducing data usage on your connection. Each PC doesn’t need to download updates from the Microsoft servers and eat up your data. To enable Windows Update Delivery Optimization, press Start > Settings > Windows Update > Advanced Options > Delivery Optimization. Make sure the “Allow downloads from other PCs” option is enabled. Also, ensure that the “Devices on my local network” option is selected.
You can also click Advanced Options from here, where you can set download and upload bandwidth throttles. You can limit the amount of upload and download bandwidth used for updates using the on-screen options.
Stop Diagnostic Info
Another thing you can do is stop Windows from sending diagnostic information to Microsoft. To disable this, press Start > Settings > Privacy & Security > Diagnostics & Feedback. From there, turn off the option to send diagnostic data to Microsoft.
Summing Up
As you can see, Windows 11 uses a lot of data—especially in the background. Luckily, there are several things you can do to reduce your data usage in Windows 11. Setting your connection as metered is one of the most effective ways to save data, but there are plenty of other things you can turn off if needed. It’s also worth noting that you can pause Windows 11 Updates for up to a week (you can defer updates longer on Windows 10). If you’re new to Windows 11, take a look at how to move the Start button to the left or the new way to open Task Manager. If you have troubleshooting issues, check out how to create a Restore Point or how to reset Windows 11 to factory settings. Comment Name * Email *
Δ Save my name and email and send me emails as new comments are made to this post.
![]()

