If you have a GIF that you want to use on one of your slides, then our tutorial below will show you how to do it. While you are using Powerpoint 2010 for its ability to convey your information to a large group of individuals, you also need to keep their attention. The bulk of what you are teaching may involve the words on your slides, but a lot can be gained by including relevant images in your presentation. Powerpoint 2010 allows for a diverse amount of images to be inserted into your slides, but most people will be concerned about the three most common – JPEG, PNG, and GIF. These are the image types that are most prevalent on websites, and they are the types that will be offloaded from most digital cameras by default. By following the tutorial in this article you can learn how to insert a GIF into Powerpoint 2010 as a means to enhance the content of your slides. Related Topic: If a picture that you add to your slideshow needs some editing, then read our guide to cropping pictures in Powerpoint.
Adding GIF Images to Your Powerpoint 2010 Presentation (Guide with Pictures)
The GIF image format is one that has been heavily used for many years. This popularity is due to the relatively small file size that you can achieve with the image, while also having access to some advanced features. These advanced features include things like making an animated GIF, which you can accomplish with several different image editing programs. Powerpoint’s compatibility with different file types makes it possible to use GIF files in your images, even if they do contain elements of animation. You will only be able to see the “animated” part of the GIF when you are actually viewing the slideshow. It will appear as a static image while editing the Powerpoint presentation.
Step 1: Double-click your Powerpoint file to open it in the program.
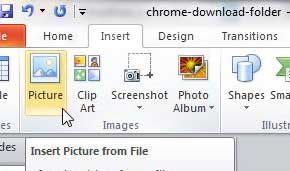
Step 2: Click the Insert tab at the top of the window, then click the Picture button in the Images section of the ribbon at the top of the window.
Step 3: Browse to the image that you want to add to the slide, then double-click the file to insert the image.
Now that you know how to add a GIF to Powerpoint you may find that you need to reposition it, or make some adjustments to the picture.
How to Format GIFs in Powerpoint
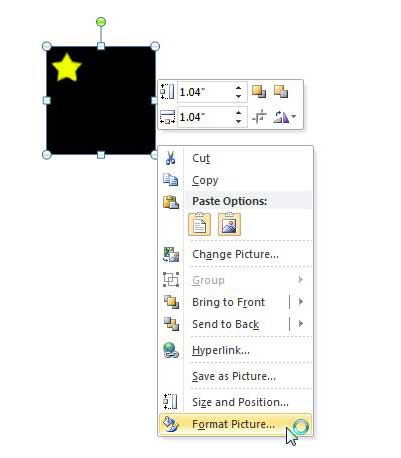
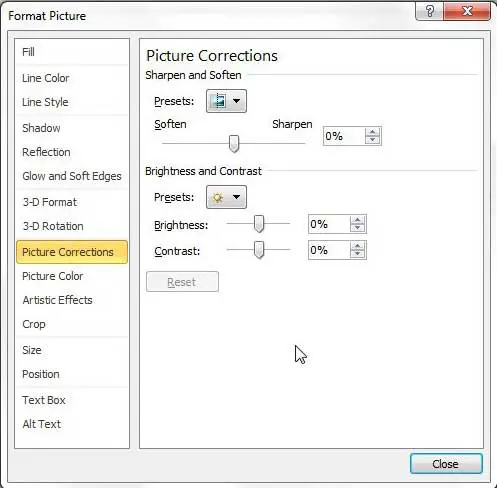
You can move the image around on the page by clicking and dragging the GIF to your preferred location. If you want to make changes to the appearance or size of your GIF file, right-click the image, then click Format Picture. This action opens a new Format Picture window that contains a number of different image-editing menus at the left side of the window. Learn and experiment with the assorted options on these menus to best customize your GIF for the needs of the slideshow. For example, the Picture Corrections option at the left side of the window includes sliders that allow you to modify the Brightness and Contrast of your GIF image. Once you have finished modifying the image, click the Close button at the bottom of the window.
Summary – How to insert a GIF into Powerpoint 2010
Do you need to display your Powerpoint slideshow in Portrait orientation, but you’re having trouble figuring out how? Read our article on changing orientation in Powerpoint to see how to switch the orientation of your Powerpoint file. After receiving his Bachelor’s and Master’s degrees in Computer Science he spent several years working in IT management for small businesses. However, he now works full time writing content online and creating websites. His main writing topics include iPhones, Microsoft Office, Google Apps, Android, and Photoshop, but he has also written about many other tech topics as well. Read his full bio here.


