This is particularly common with pictures, which can be a problem when you also need ot see the items that are under the picture. Fortunately, you can learn how to make an image transparent in Google Slides by adjusting one of the options that you will find on the Format options menu that appears when you select one of your images.
How to Make an Image Transparent in Google Slides
Our article continues below with additional information on adjusting image transparency in Google Slides, including pictures of these steps. If an image that you are adding to a slide is going to be on top of something, or you are placing text on top of it, then it can be tough to see everything. Therefore you might need to know how to increase the transparency of an image in Google Slides. Sometimes when you are placing a picture into a slideshow, that picture is completely ready for the presentation. It’s already been edited in a different image-editing program, or the picture was created expressly for the presentation, and therefore requires no edits. But we aren’t always that lucky, and it’s quite common that a picture you want to use on one of your slides needs some sort of adjustment before it looks the way that you want it to look. Google Slides has some image-editing tools for the pictures that you add to your slides, and one of those tools lets you increase the transparency of the image. You can continue reading below to see how you can make a picture transparent in your presentation. If you would like your image to be a circle instead of a rectangle, then check out this how to make a picture a circle in Powerpoint tutorial to learn how.
How to Make a Picture Transparent in Google Slides (Guide with Pictures)
The steps in this article were performed in the desktop version of Google Chrome. This guide assumes that you already have a picture in your presentation and that you want to make it transparent. This will allow you to see the presentation elements on the layers below the picture. For example, if you have a theme with a background, you will be able to see the background through the picture. Now that you know how to make a picture transparent in Google Slides you will be able to apply this in the future anytime that you don’t want a fully opaque image on one of your slides. Does your Google Slides presentation have a slide that you don’t need anymore? Find out how to delete an entire slide in Google Slides so that it’s no longer a part of the slideshow.
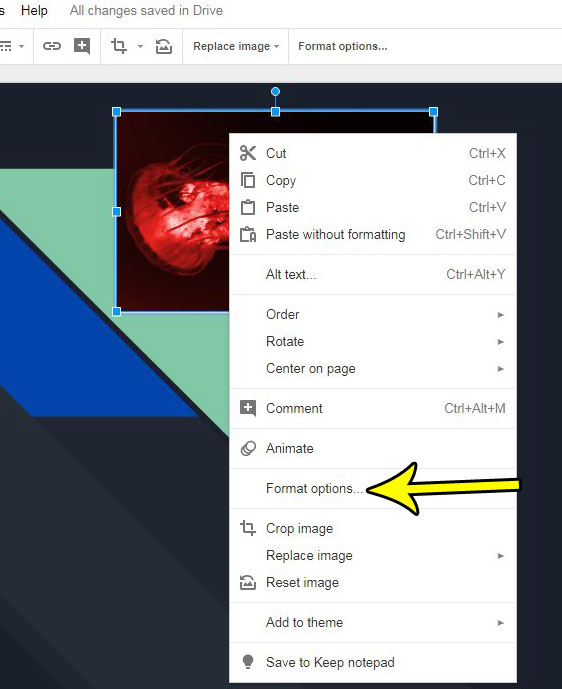
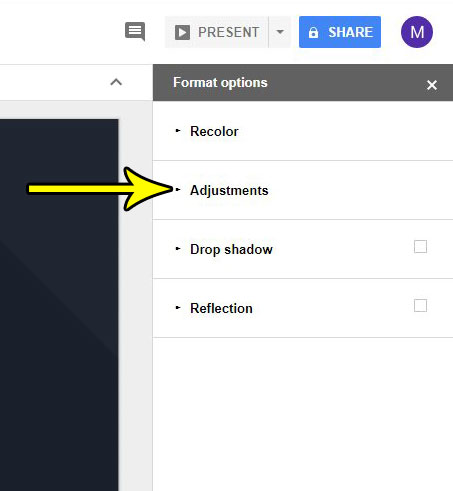
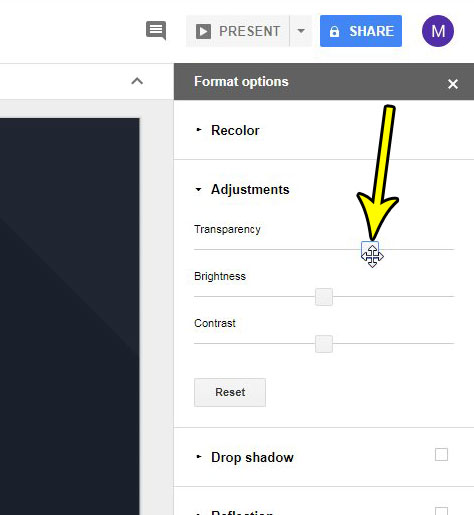
Unfortunately, this means that you would need to use another application like Photoshop or the remove.bg website if you wanted to remove the background from a picture on a Google slide. The remove.bg tool is a really useful option to give an image a transparent background, and it can save you a lot of hassle if you need to remove multiple image backgrounds. Once the background is removed you can upload that picture and add it to the slide as normal. To do this you will need to click on the first desired image that you wish to modify. You can then hold down the Ctrl key on your keyboard and click each additional picture that you wish to change. Once all the images are selected you can use the same steps as above to create a transparent image. This means clicking the Format options button in the toolbar, expanding the Adjustments menu, then dragging the transparency slider as needed. Usually an image that you have in the background of a slide is going to be faded so that the main content is easily visible. Once you have changed the picture’s transparency setting you can click the Arrange tab at the top of the window, select Order, then click the Send to Back option to place the picture into the background layer. You will then be able to easily put other objects like text boxes or other images on top of that image. The right end of the slider is 100% opacity, which means that the image is completely transparent.
He specializes in writing content about iPhones, Android devices, Microsoft Office, and many other popular applications and devices. Read his full bio here.


