When you initially create a spreadsheet, you often do so by including a row of column titles in the first row of the spreadsheet. Generally, this allows you to specify the fields of data that you need for the spreadsheet’s purposes, ensuring that you have everything that you need in order to properly evaluate your data. But as you are completing the spreadsheet and populating your cells with data, you may discover that a particular column of data isn’t needed, is not serving its intended purposes, or might even be incorrect. Fortunately, you are able to delete data in Google Sheets, and you can even delete an entire column if it isn’t needed anymore.
How to Delete a Google Sheets Column
Our guide continues below with more information on deleting columns in Google Sheets, including pictures of these steps. If you don’t see any of the buttons or menus in your spreadsheet, then our Google Sheets menu bar missing guide can help you get it back.
How to Remove an Existing Column from a Spreadsheet in Google Sheets (Guide with Pictures)
The steps in this guide are going to show you how to delete a column from a spreadsheet in Google Sheets. Once you have deleted this column you will not be able to access the data in the deleted cells again in the future.
Step 1: Sign in to your Google Drive at https://drive.google.com/drive/my-drive and open the spreadsheet containing the column that you want to delete.
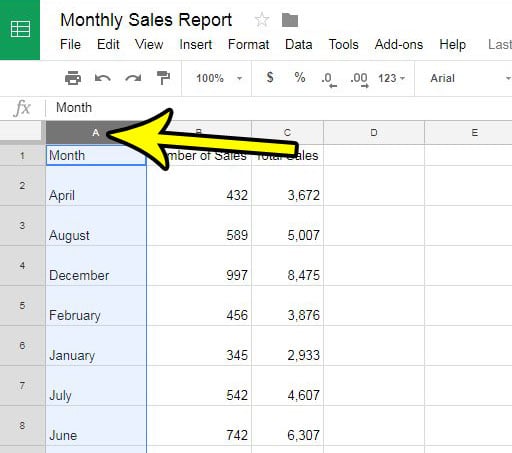
Step 2: Click the column letter at the top of the spreadsheet for the column that you want to delete.
This will select that entire column.
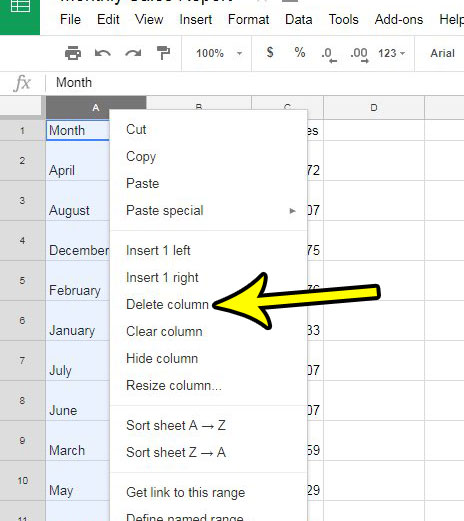
Step 3: Right-click on the selected column letter, then click the Delete column option.
The steps above will let you delete single columns, but what if you want to delete more than one column at a time?
How to Delete Multiple Columns in Google Sheets
One of the nice things about spreadsheet applications like Google Sheets, or the Microsoft Office alternative, Microsoft Excel, is that you can select multiple cells or ranges of cells and apply a change to that entire selection. This goes for deleting ranges, too. If you have more than one column in your Google Sheets spreadsheet that you want to remove then you can hold down the Ctrl key and click each column letter that you want to delete. You can then right-click one of the selected columns and choose the Delete selected columns option to delete each selected column from the worksheet.
How to Add Columns in Google Sheets
If your spreadsheet needs another column of data, but it needs to be placed between existing columns, then you are able to accomplish this. You will need to click the column letter to the right of where you wish to add the new column. You can then right-click on the selected column and choose the Insert 1 left option. I mentioned adding a column to the left of an existing column but, as you saw if you just used that step to add a column, you can also select the column to the left of where you wish to add a new column and select the Insert 1 right option instead.
How to Delete Rows in Google Sheets
The way that you can delete row ranges in Google Sheets is the same as how you would delete columns in a Google Sheets document. You can click a row number at the left side of the spreadsheet, then right-click the selected row and choose the “Delete row” option. If you want to delete multiple rows then you can hold down the Ctrl key, click all the rows that you want to remove, then right-click a cell from the selected data set and choose Delete selected rows.
How to Delete Columns in Google Docs Tables
The process for removing a column from a table in a document is a little different than the one referenced in this article. If you are using the Google Apps word processing application, Google Docs, then you will be working with a table that is inside one of the pages in the document. To delete columns from Google Docs you will need to click inside one of the cells in the column that you wish to delete, then right-click on that cell and choose the Delete column option. The same method can be used to delete rows from Google Docs tables.
More Information on How to Delete Columns In Google Sheets
The process for deleting columns and rows in Google Sheets, whether it’s a single range or cells or if you want to include more than one row or column, is very similar. All you need to do is select the row or column, or the rows or columns, that you no longer want in your spreadsheet, then right-click on a selected cell and choose the desired action. Note that deleting a row or column will cause all of the other data either to the right of the deleted column or underneath the deleted row, to be moved to a different cell location. Assuming that existing rows are using relative references then they will update automatically to accommodate the new position of the data. If you need to add rows rather than remove rows from your spreadsheet then you can select a row number, then right-click the selected row and use the Insert 1 below or Inset 1 above option to add more rows. You can also use the Ctrl + Alt + Shift + + keyboard shortcut to add blank rows below your currently-selected row. This can also be used to add blank columns inside of your dataset. This is my preferred way to add empty rows or empty columns to a spreadsheet because it feels faster when you need to a lot of empty cells into your spreadsheet and you don’t want to have to right-click and select insert options from that shortcut menu. Do you need to add another column to your spreadsheet, rather than delete one? Find out how to insert a column in Google Sheets if you need to include an additional field of data amidst the existing columns of data that you have.
Additional Reading
He specializes in writing content about iPhones, Android devices, Microsoft Office, and many other popular applications and devices. Read his full bio here.


